本帖最后由 云天 于 2025-3-27 19:47 编辑
【项目背景】
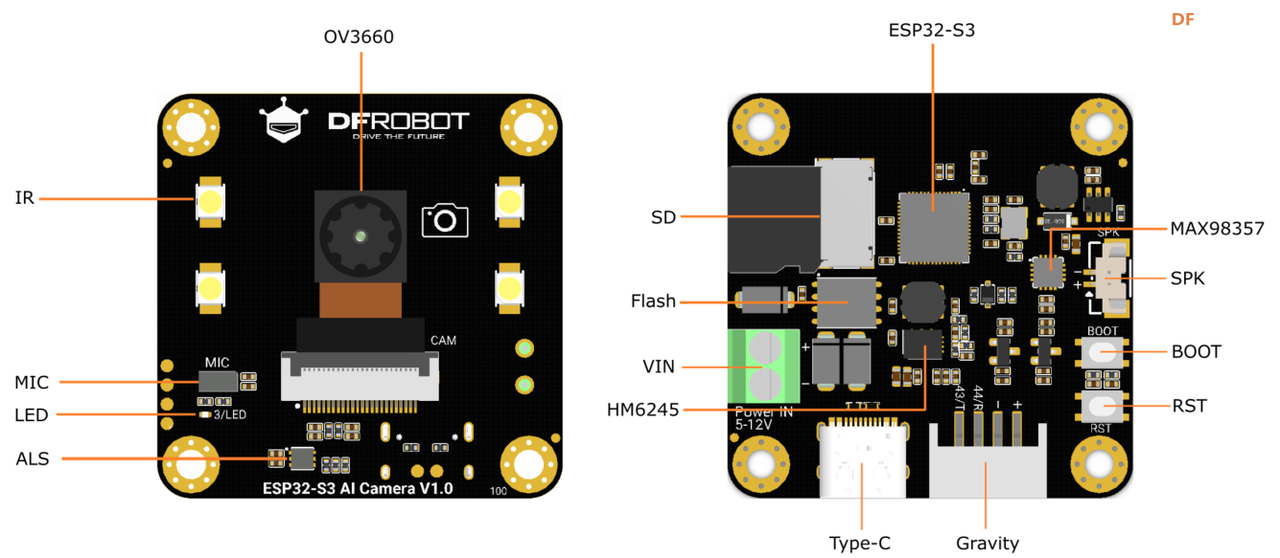
DF创客社区近期开启了福利发放活动,其中一项福利是提供人工智能设备“ESP32-S3 AI智能摄像头模块”的免费试用。尽管试用名单尚未公布,但我已按捺不住内心的期待,提前从DF创客商城购买了一台。如果我有幸入选试用名单,我计划开展一个双摄像头模块项目,探索更多的可能性。
【项目设计】
本项目的设计灵感来源于产品使用教程中的思路。项目的核心是“ESP32-S3 AI智能摄像头模块”,它负责采集图像数据。与此同时,电脑上的Python程序将对采集到的图像进行处理。具体而言,Python程序会将获取的图像发送给Kimi大模型进行图像理解,随后将模型返回的文本信息发送给讯飞语音合成平台,生成语音反馈。最终,利用Pygame库在电脑上播放反馈的音频。
【项目功能】
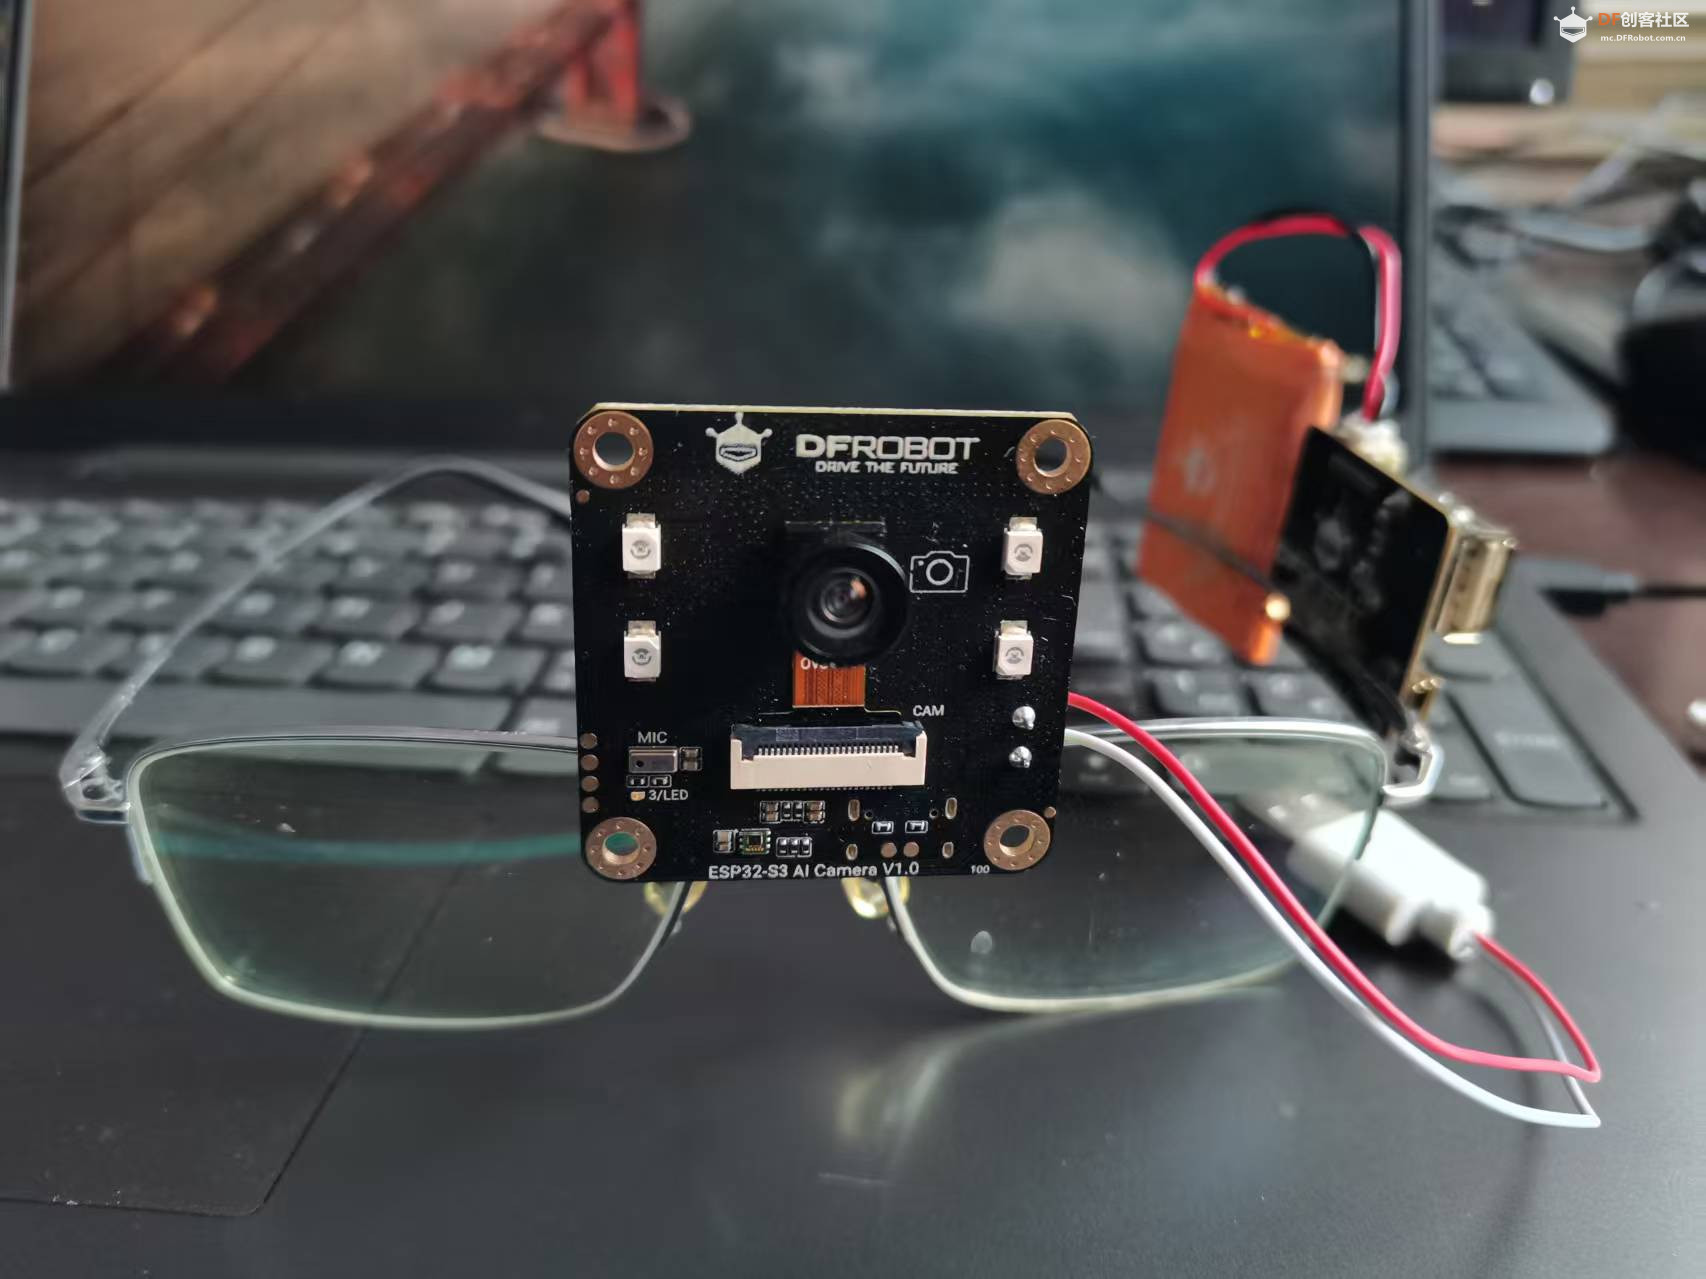
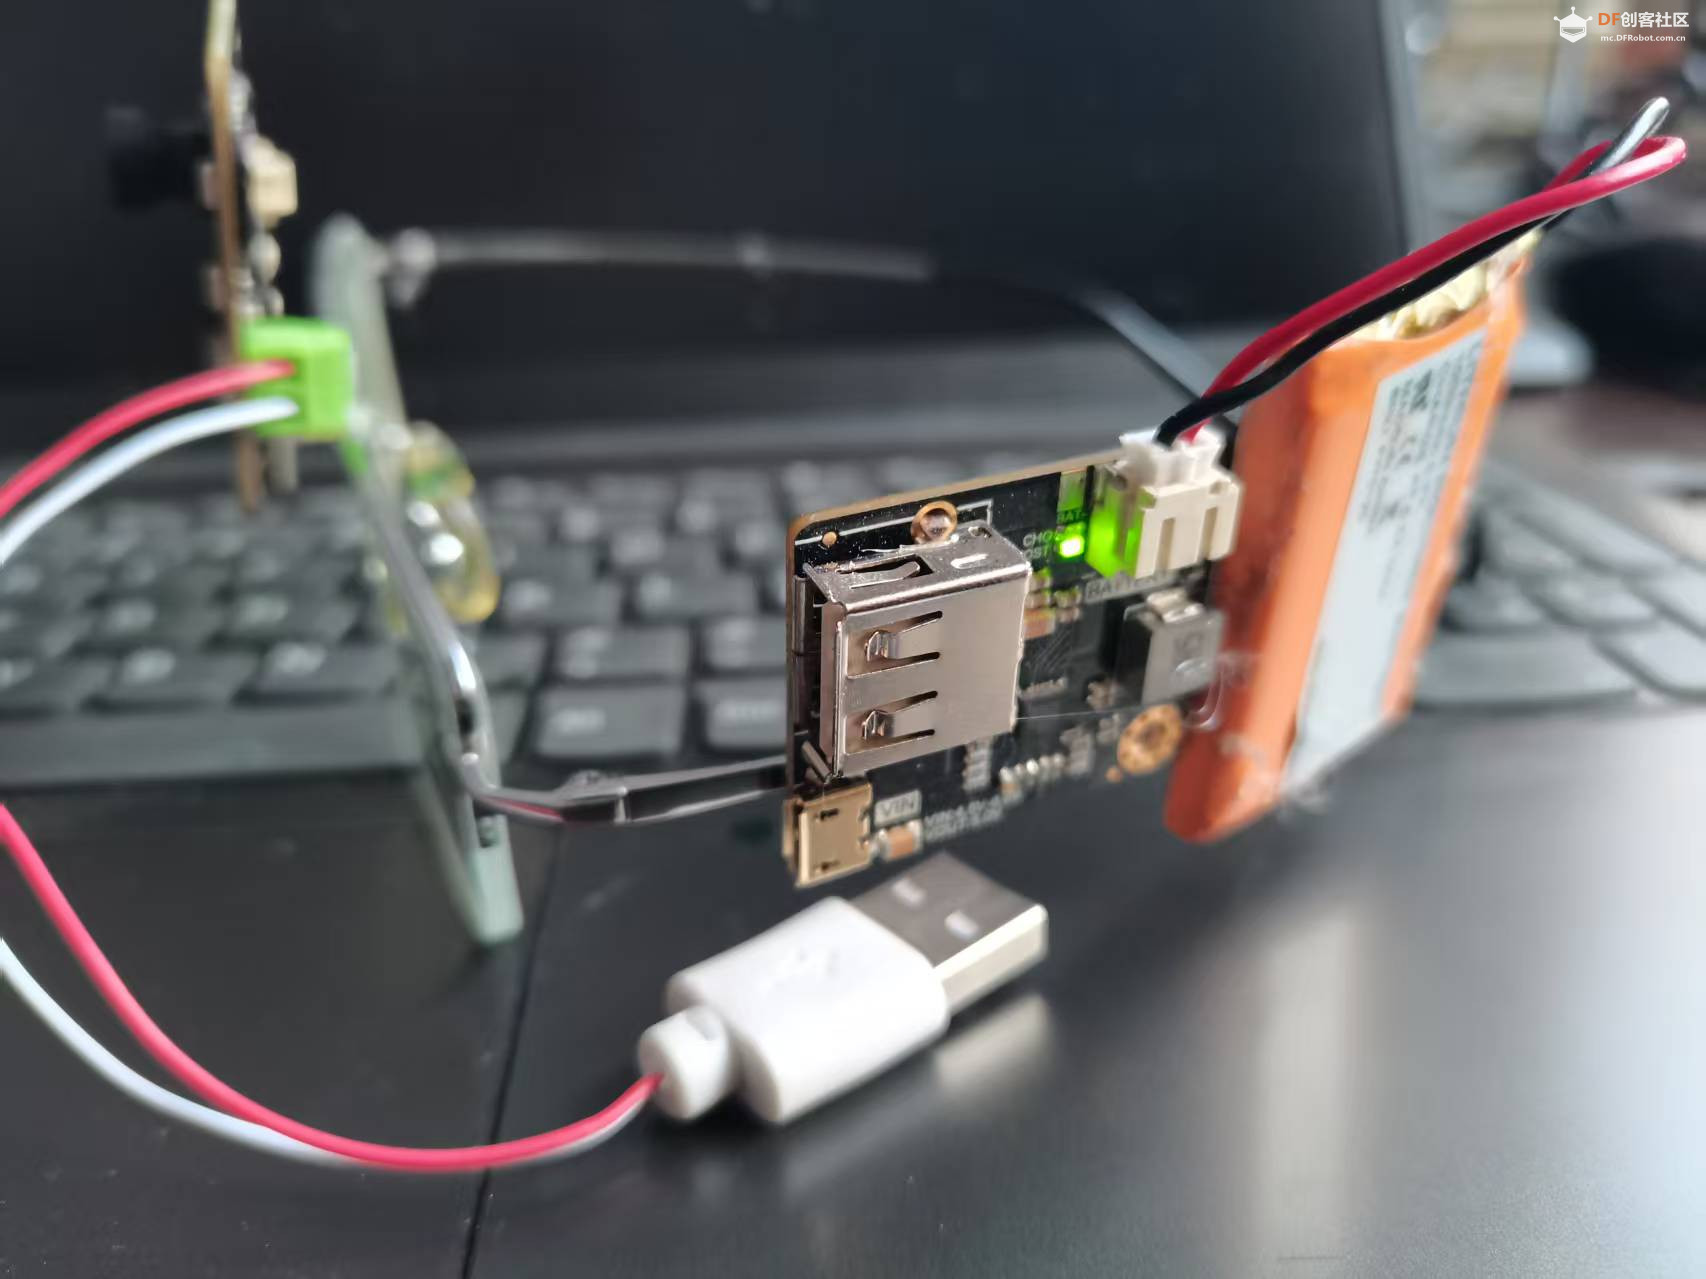
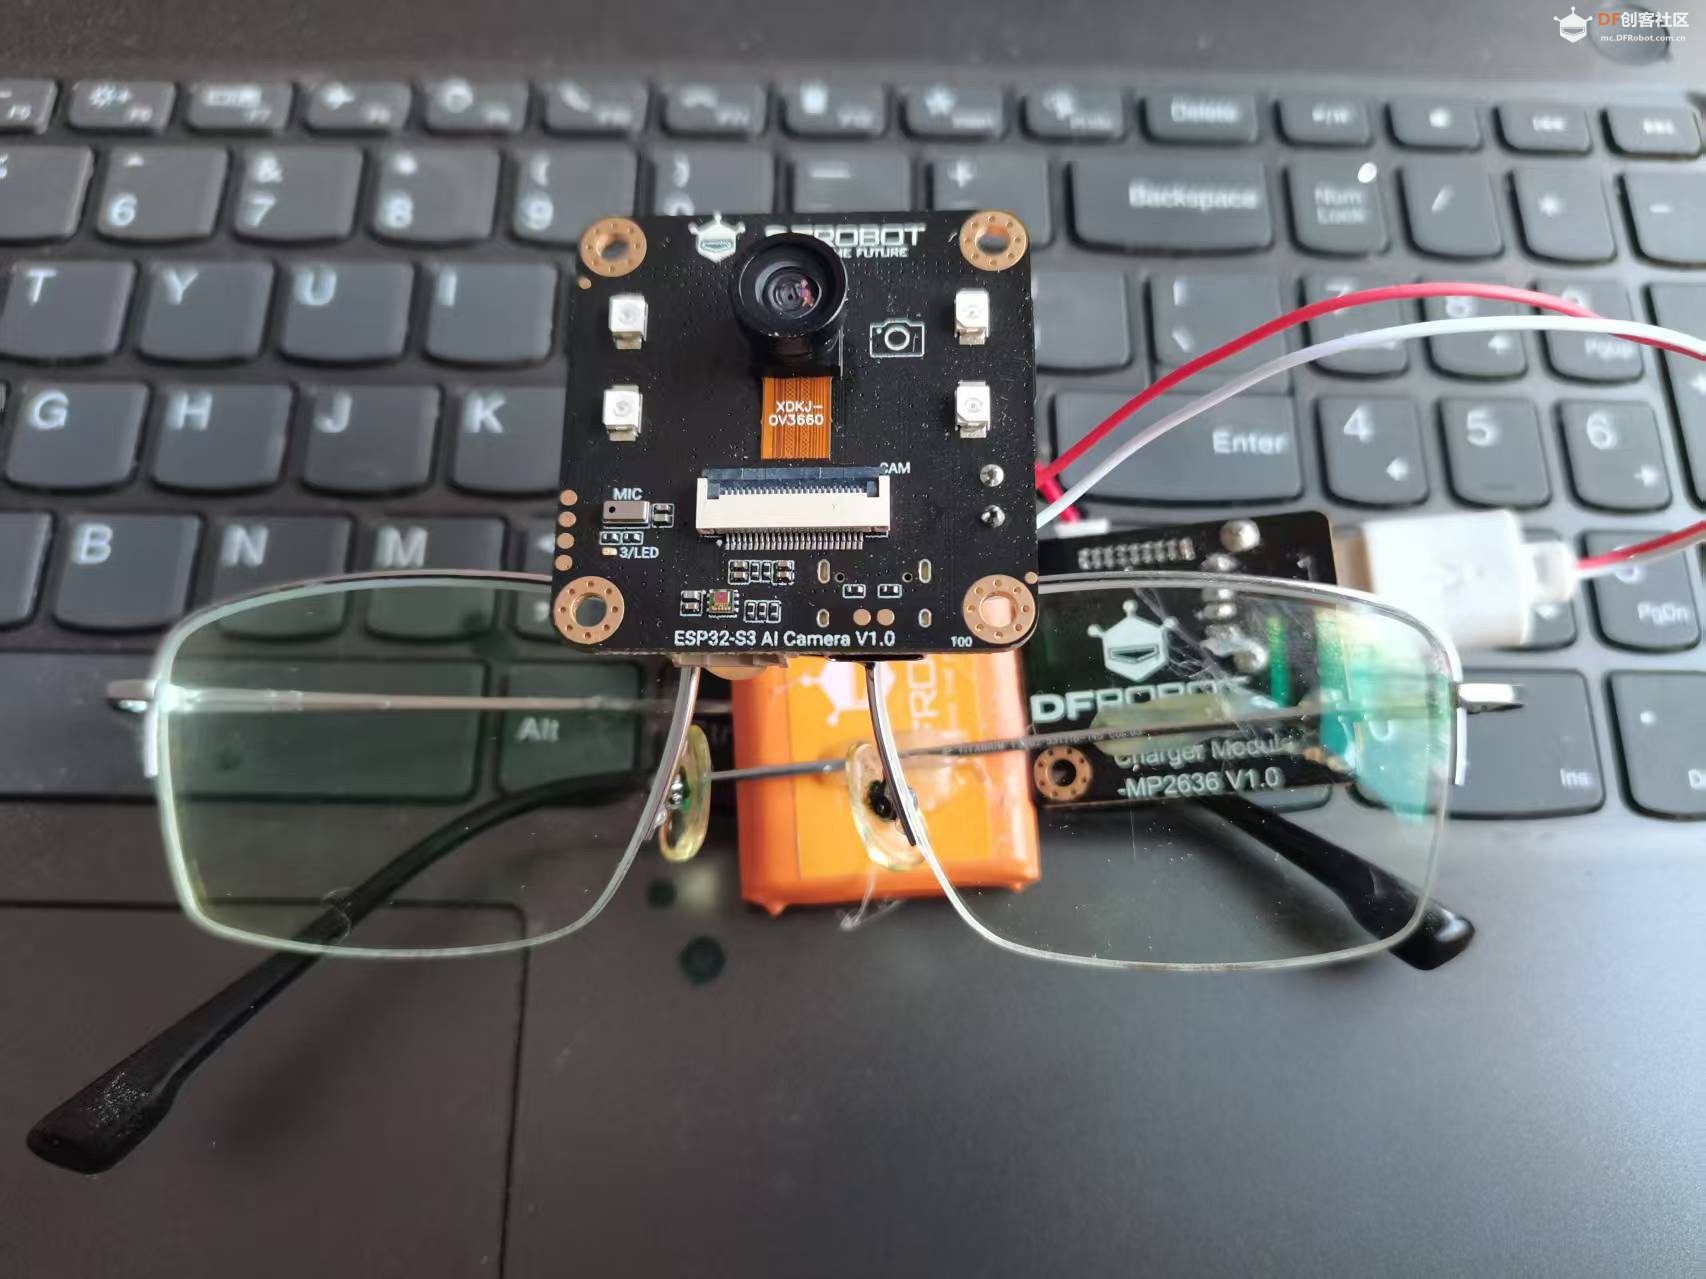
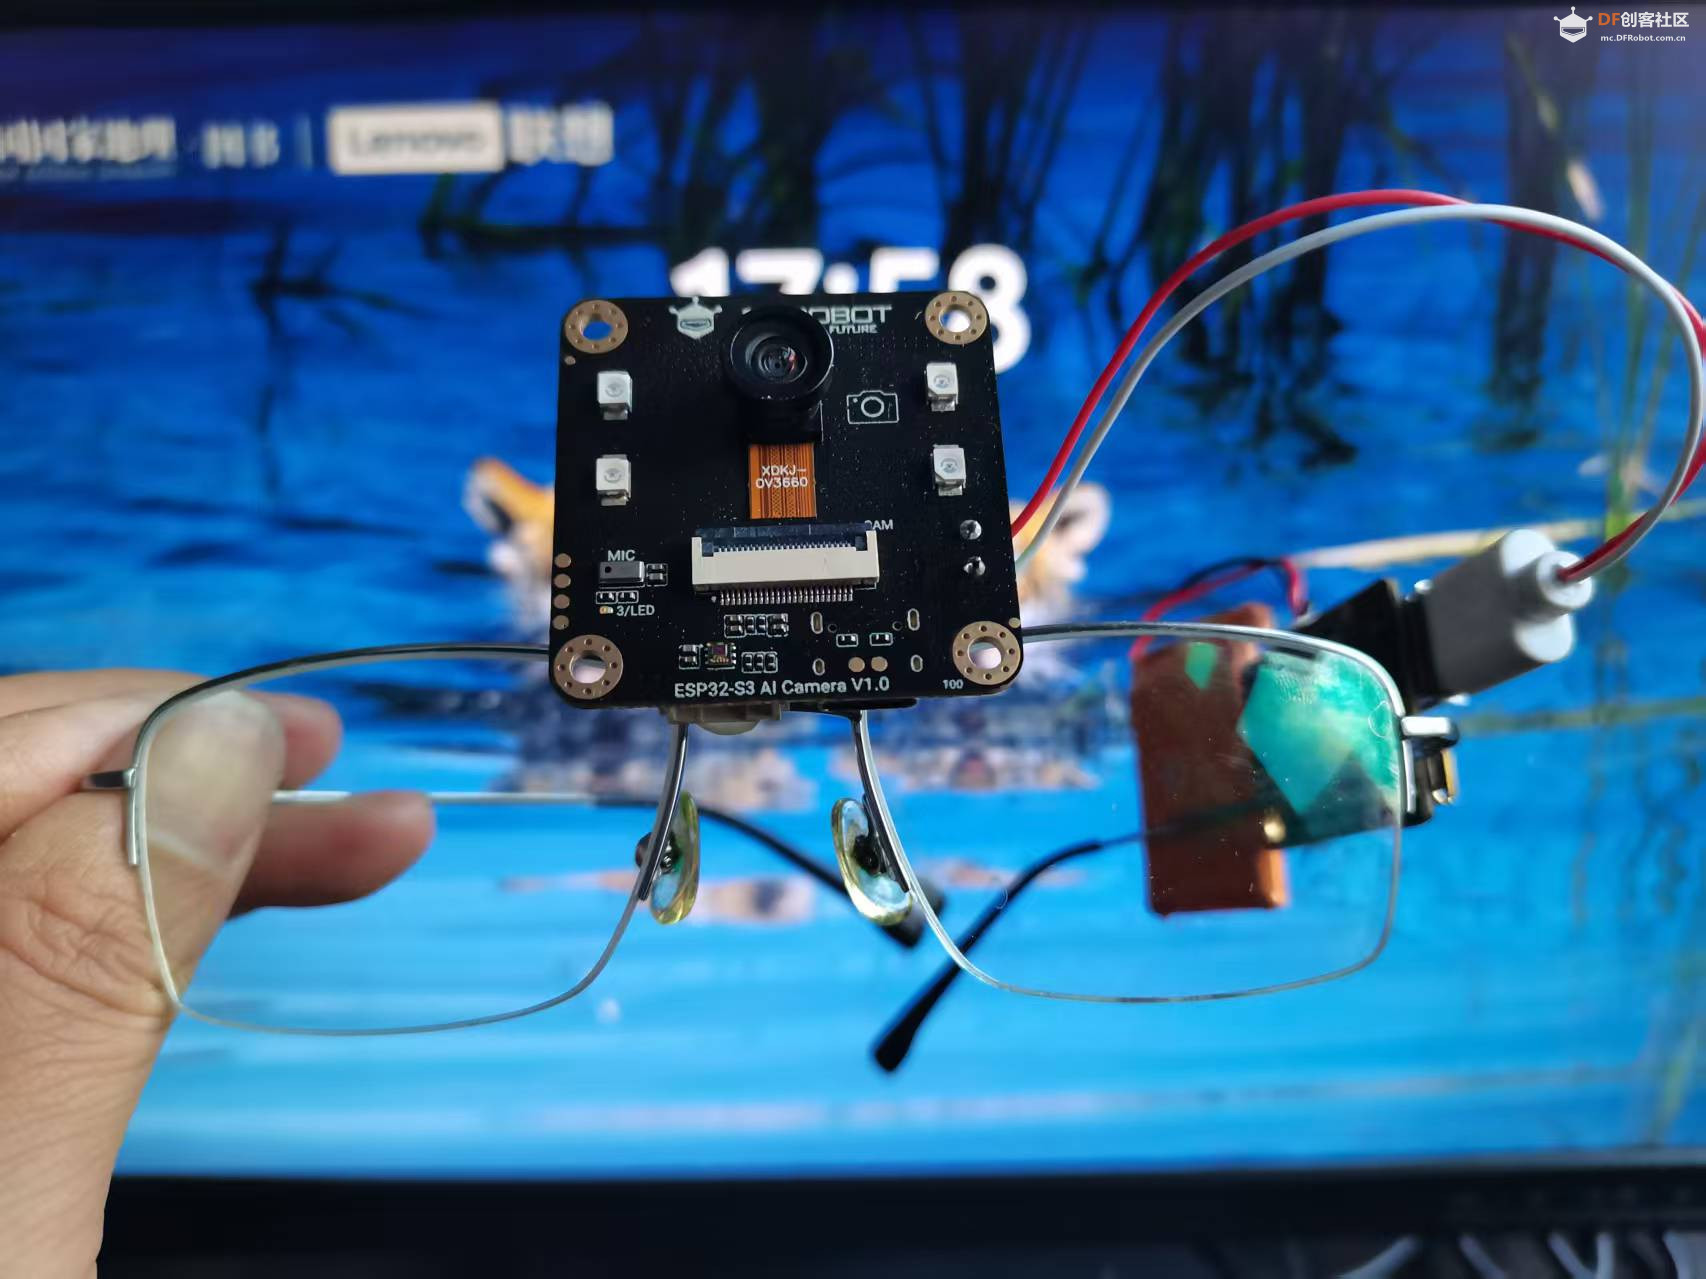
本项目将“ESP32-S3 AI智能摄像头模块”巧妙地固定在一副眼镜上,让盲人佩戴这副眼镜采集图像。电脑端会通过语音播放图像分析结果,帮助盲人了解当前室内的环境情况。这一功能旨在为视障人士提供更便捷、更直观的环境感知方式,提升他们的生活质量和独立性。
【迭代设想】
目前,项目的图像处理和语音合成功能主要依赖电脑端实现。为了进一步优化项目,我们计划将这些功能移植到“ESP32-S3 AI智能摄像头模块”上,使其能够独立运行。这样,项目将不再受限于电脑设备,能够更灵活地应用于各种场景,如户外、公共场所等,从而扩大项目的应用范围和实用性。
【程序设计一】
ESP32-S3端程序
使用“产品维库”中的教程,上传程序——视频图传。
步骤
1.在Arduino IDE中选择File->Examples->ESP32->Camera->CameraWebServer示例
2.使用下面的代码替换CameraWebServer中的代码(注意:需要填入WIFI账号密码)
3.打开串口监视器查看ip地址
4.通过局域网内的设备通过浏览器访问ip,点击start即可看到监控画面
- #include "esp_camera.h"
- #include <WiFi.h>
-
- //
- // WARNING!!! PSRAM IC required for UXGA resolution and high JPEG quality
- // Ensure ESP32 Wrover Module or other board with PSRAM is selected
- // Partial images will be transmitted if image exceeds buffer size
- //
- // You must select partition scheme from the board menu that has at least 3MB APP space.
- // Face Recognition is DISABLED for ESP32 and ESP32-S2, because it takes up from 15
- // seconds to process single frame. Face Detection is ENABLED if PSRAM is enabled as well
-
- #define PWDN_GPIO_NUM -1
- #define RESET_GPIO_NUM -1
- #define XCLK_GPIO_NUM 5
- #define Y9_GPIO_NUM 4
- #define Y8_GPIO_NUM 6
- #define Y7_GPIO_NUM 7
- #define Y6_GPIO_NUM 14
- #define Y5_GPIO_NUM 17
- #define Y4_GPIO_NUM 21
- #define Y3_GPIO_NUM 18
- #define Y2_GPIO_NUM 16
- #define VSYNC_GPIO_NUM 1
- #define HREF_GPIO_NUM 2
- #define PCLK_GPIO_NUM 15
- #define SIOD_GPIO_NUM 8
- #define SIOC_GPIO_NUM 9
-
- // ===========================
- // Enter your WiFi credentials
- // ===========================
- const char *ssid = "**********";
- const char *password = "**********";
-
- void startCameraServer();
- void setupLedFlash(int pin);
-
- void setup() {
- Serial.begin(115200);
- Serial.setDebugOutput(true);
- Serial.println();
-
- camera_config_t config;
- config.ledc_channel = LEDC_CHANNEL_0;
- config.ledc_timer = LEDC_TIMER_0;
- config.pin_d0 = Y2_GPIO_NUM;
- config.pin_d1 = Y3_GPIO_NUM;
- config.pin_d2 = Y4_GPIO_NUM;
- config.pin_d3 = Y5_GPIO_NUM;
- config.pin_d4 = Y6_GPIO_NUM;
- config.pin_d5 = Y7_GPIO_NUM;
- config.pin_d6 = Y8_GPIO_NUM;
- config.pin_d7 = Y9_GPIO_NUM;
- config.pin_xclk = XCLK_GPIO_NUM;
- config.pin_pclk = PCLK_GPIO_NUM;
- config.pin_vsync = VSYNC_GPIO_NUM;
- config.pin_href = HREF_GPIO_NUM;
- config.pin_sccb_sda = SIOD_GPIO_NUM;
- config.pin_sccb_scl = SIOC_GPIO_NUM;
- config.pin_pwdn = PWDN_GPIO_NUM;
- config.pin_reset = RESET_GPIO_NUM;
- config.xclk_freq_hz = 20000000;
- config.frame_size = FRAMESIZE_UXGA;
- config.pixel_format = PIXFORMAT_JPEG; // for streaming
- //config.pixel_format = PIXFORMAT_RGB565; // for face detection/recognition
- config.grab_mode = CAMERA_GRAB_WHEN_EMPTY;
- config.fb_location = CAMERA_FB_IN_PSRAM;
- config.jpeg_quality = 12;
- config.fb_count = 1;
-
- // if PSRAM IC present, init with UXGA resolution and higher JPEG quality
- // for larger pre-allocated frame buffer.
- if (config.pixel_format == PIXFORMAT_JPEG) {
- if (psramFound()) {
- config.jpeg_quality = 10;
- config.fb_count = 2;
- config.grab_mode = CAMERA_GRAB_LATEST;
- } else {
- // Limit the frame size when PSRAM is not available
- config.frame_size = FRAMESIZE_SVGA;
- config.fb_location = CAMERA_FB_IN_DRAM;
- }
- } else {
- // Best option for face detection/recognition
- config.frame_size = FRAMESIZE_240X240;
- #if CONFIG_IDF_TARGET_ESP32S3
- config.fb_count = 2;
- #endif
- }
-
- #if defined(CAMERA_MODEL_ESP_EYE)
- pinMode(13, INPUT_PULLUP);
- pinMode(14, INPUT_PULLUP);
- #endif
-
- // camera init
- esp_err_t err = esp_camera_init(&config);
- if (err != ESP_OK) {
- Serial.printf("Camera init failed with error 0x%x", err);
- return;
- }
-
- sensor_t *s = esp_camera_sensor_get();
- // initial sensors are flipped vertically and colors are a bit saturated
- if (s->id.PID == OV3660_PID) {
- s->set_vflip(s, 1); // flip it back
- s->set_brightness(s, 1); // up the brightness just a bit
- s->set_saturation(s, -2); // lower the saturation
- }
- // drop down frame size for higher initial frame rate
- if (config.pixel_format == PIXFORMAT_JPEG) {
- s->set_framesize(s, FRAMESIZE_QVGA);
- }
-
- #if defined(CAMERA_MODEL_M5STACK_WIDE) || defined(CAMERA_MODEL_M5STACK_ESP32CAM)
- s->set_vflip(s, 1);
- s->set_hmirror(s, 1);
- #endif
-
- #if defined(CAMERA_MODEL_ESP32S3_EYE)
- s->set_vflip(s, 1);
- #endif
-
- // Setup LED FLash if LED pin is defined in camera_pins.h
- #if defined(LED_GPIO_NUM)
- setupLedFlash(LED_GPIO_NUM);
- #endif
-
- WiFi.begin(ssid, password);
- WiFi.setSleep(false);
-
- Serial.print("WiFi connecting");
- while (WiFi.status() != WL_CONNECTED) {
- delay(500);
- Serial.print(".");
- }
- Serial.println("");
- Serial.println("WiFi connected");
-
- startCameraServer();
-
- Serial.print("Camera Ready! Use 'http://");
- Serial.print(WiFi.localIP());
- Serial.println("' to connect");
- }
-
- void loop() {
- // Do nothing. Everything is done in another task by the web server
- delay(10000);
- }
- 录音、播放声音
- 通过该示例可以实现录音、放音功能。烧录代码并复位开发板,LED灯点亮后开始录音5秒,LED灯熄灭后通过喇叭播放录音。
-
- #include <Arduino.h>
- #include <SPI.h>
-
- #include "ESP_I2S.h"
-
- #define SAMPLE_RATE (16000)
- #define DATA_PIN (GPIO_NUM_39)
- #define CLOCK_PIN (GPIO_NUM_38)
- #define REC_TIME 5 //Recording time 5 seconds
-
- void setup()
- {
- uint8_t *wav_buffer;
- size_t wav_size;
- I2SClass i2s;
- I2SClass i2s1;
- Serial.begin(115200);
- pinMode(3, OUTPUT);
- pinMode(41, OUTPUT);
- i2s.setPinsPdmRx(CLOCK_PIN, DATA_PIN);
- if (!i2s.begin(I2S_MODE_PDM_RX, SAMPLE_RATE, I2S_DATA_BIT_WIDTH_16BIT, I2S_SLOT_MODE_MONO)) {
- Serial.println("Failed to initialize I2S PDM RX");
- }
- i2s1.setPins(45, 46, 42);
- if (!i2s1.begin(I2S_MODE_STD, SAMPLE_RATE, I2S_DATA_BIT_WIDTH_16BIT, I2S_SLOT_MODE_MONO)) {
- Serial.println("MAX98357 initialization failed!");
- }
- Serial.println("start REC");
- digitalWrite(3, HIGH);
- wav_buffer = i2s.recordWAV(REC_TIME, &wav_size);
- digitalWrite(3, LOW);
- //Play the recording
- i2s1.playWAV(wav_buffer, wav_size);
- }
-
- void loop()
- {
-
- }
电脑端Python程序- # 导入所需的库
- import os
- import base64
- from openai import OpenAI
- import cv2
- import urllib.request
- import numpy as np
- from df_xfyun_speech import XfTts # 用于语音合成
- import pygame,time
- pygame.mixer.init() # 初始化pygame的音频模块
-
- # 配置讯飞语音合成的参数
- appId = "f6e50ac1" # 应用ID
- apiKey ="11ecfe2c70c42cadda1bae3916576ec4" # API密钥
- apiSecret = "NGQwMjdiYTY0ZGZkZDI5MTJlMGQ4Yzhk" # API密钥
- options = {} # 配置选项
- tts = XfTts(appId, apiKey, apiSecret, options) # 初始化语音合成对象
-
- # ESP32-CAM的IP地址,用于获取摄像头图像
- url = 'http://192.168.31.96:80/capture'
-
- # 配置OpenAI的客户端
- client = OpenAI(
- api_key="sk-l77I27a8yfbu1hie5jj9FJOIexixS1RRdLFVEv2xbRiFsb3k", # Kimi的API密钥
- base_url="https://api.moonshot.cn/v1", # Kimi的API地址
- )
- while True:
- # 从ESP32-CAM的URL获取图像数据
- img_resp = urllib.request.urlopen(url) # 打开URL获取图像数据
- imgnp = np.array(bytearray(img_resp.read()), dtype=np.uint8) # 将图像数据转换为NumPy数组
- image_data = cv2.imdecode(imgnp, -1) # 解码JPEG图像数据
-
- # 创建一个窗口用于显示实时图像
- cv2.namedWindow("live transmission", cv2.WINDOW_AUTOSIZE)
- cv2.imshow("live transmission", image_data) # 显示实时图像
- cv2.imwrite("Mind+.png", image_data) # 将图像保存为文件
-
- # 读取保存的图像文件
- with open("Mind+.png", "rb") as f:
- image_data = f.read()
-
- # 按下 'q' 键退出
- if cv2.waitKey(1) & 0xFF == ord('q'):
- pass
-
- # 将图片编码成 base64 格式的 image_url
- image_url = f"data:image/{os.path.splitext('Mind+.png')[1]};base64,{base64.b64encode(image_data).decode('utf-8')}"
-
- # 调用Kimi的API,将图片和文字指令发送给模型
- completion = client.chat.completions.create(
- model="moonshot-v1-8k-vision-preview", # 使用的模型
- messages=[
- {"role": "system", "content": "你是 Kimi。"}, # 系统角色的提示
- {
- "role": "user",
- # 用户的输入,包含图片和文字指令
- "content": [
- {
- "type": "image_url", # 图片部分
- "image_url": {
- "url": image_url, # 图片的base64编码
- },
- },
- {
- "type": "text",
- "text": "请描述图片的内容。", # 文字指令
- },
- ],
- },
- ],
- )
-
- # 获取模型返回的描述信息
- message = completion.choices[0].message.content
- print(message) # 打印描述信息
-
- # 将描述信息合成语音
- tts.synthesis(message, "speech.wav") # 生成语音文件
- pygame.mixer.Sound("speech.wav").play() # 播放语音
- time.sleep(15)
【程序设计二】
使用TCP发送和接收图像,具体步骤:
1. 在ESP32的代码中添加定时器或使用循环中的延时来触发图像捕获和发送。
2. 捕获一帧图像,获取图像数据的缓冲区。
3. 建立TCP连接到电脑的指定IP和端口,发送图像数据。
4. 在电脑端,用Python编写一个TCP服务器,接收数据并保存或显示图像。
ESP32-S3端程序
- #include "esp_camera.h"
- #include <WiFi.h>
- const char* pc_ip = "192.168.1.110"; // 替换为电脑的IP
- const uint16_t pc_port = 12345;
- //
- // WARNING!!! PSRAM IC required for UXGA resolution and high JPEG quality
- // Ensure ESP32 Wrover Module or other board with PSRAM is selected
- // Partial images will be transmitted if image exceeds buffer size
- //
- // You must select partition scheme from the board menu that has at least 3MB APP space.
- // Face Recognition is DISABLED for ESP32 and ESP32-S2, because it takes up from 15
- // seconds to process single frame. Face Detection is ENABLED if PSRAM is enabled as well
-
- #define PWDN_GPIO_NUM -1
- #define RESET_GPIO_NUM -1
- #define XCLK_GPIO_NUM 5
- #define Y9_GPIO_NUM 4
- #define Y8_GPIO_NUM 6
- #define Y7_GPIO_NUM 7
- #define Y6_GPIO_NUM 14
- #define Y5_GPIO_NUM 17
- #define Y4_GPIO_NUM 21
- #define Y3_GPIO_NUM 18
- #define Y2_GPIO_NUM 16
- #define VSYNC_GPIO_NUM 1
- #define HREF_GPIO_NUM 2
- #define PCLK_GPIO_NUM 15
- #define SIOD_GPIO_NUM 8
- #define SIOC_GPIO_NUM 9
-
- // ===========================
- // Enter your WiFi credentials
- // ===========================
- const char *ssid = "TP-LINK_CB88";
- const char *password = "jiaoyan2";
-
- //void startCameraServer();
- void setupLedFlash(int pin);
-
- void setup() {
- Serial.begin(115200);
- Serial.setDebugOutput(true);
- Serial.println();
-
- camera_config_t config;
- config.ledc_channel = LEDC_CHANNEL_0;
- config.ledc_timer = LEDC_TIMER_0;
- config.pin_d0 = Y2_GPIO_NUM;
- config.pin_d1 = Y3_GPIO_NUM;
- config.pin_d2 = Y4_GPIO_NUM;
- config.pin_d3 = Y5_GPIO_NUM;
- config.pin_d4 = Y6_GPIO_NUM;
- config.pin_d5 = Y7_GPIO_NUM;
- config.pin_d6 = Y8_GPIO_NUM;
- config.pin_d7 = Y9_GPIO_NUM;
- config.pin_xclk = XCLK_GPIO_NUM;
- config.pin_pclk = PCLK_GPIO_NUM;
- config.pin_vsync = VSYNC_GPIO_NUM;
- config.pin_href = HREF_GPIO_NUM;
- config.pin_sccb_sda = SIOD_GPIO_NUM;
- config.pin_sccb_scl = SIOC_GPIO_NUM;
- config.pin_pwdn = PWDN_GPIO_NUM;
- config.pin_reset = RESET_GPIO_NUM;
- config.xclk_freq_hz = 20000000;
- config.frame_size = FRAMESIZE_UXGA;
- config.pixel_format = PIXFORMAT_JPEG; // for streaming
- //config.pixel_format = PIXFORMAT_RGB565; // for face detection/recognition
- config.grab_mode = CAMERA_GRAB_WHEN_EMPTY;
- config.fb_location = CAMERA_FB_IN_PSRAM;
- config.jpeg_quality = 12;
- config.fb_count = 1;
-
- // if PSRAM IC present, init with UXGA resolution and higher JPEG quality
- // for larger pre-allocated frame buffer.
- if (config.pixel_format == PIXFORMAT_JPEG) {
- if (psramFound()) {
- config.jpeg_quality = 10;
- config.fb_count = 2;
- config.grab_mode = CAMERA_GRAB_LATEST;
- } else {
- // Limit the frame size when PSRAM is not available
- config.frame_size = FRAMESIZE_SVGA;
- config.fb_location = CAMERA_FB_IN_DRAM;
- }
- } else {
- // Best option for face detection/recognition
- config.frame_size = FRAMESIZE_240X240;
- #if CONFIG_IDF_TARGET_ESP32S3
- config.fb_count = 2;
- #endif
- }
-
- #if defined(CAMERA_MODEL_ESP_EYE)
- pinMode(13, INPUT_PULLUP);
- pinMode(14, INPUT_PULLUP);
- #endif
-
- // camera init
- esp_err_t err = esp_camera_init(&config);
- if (err != ESP_OK) {
- Serial.printf("Camera init failed with error 0x%x", err);
- return;
- }
-
- sensor_t *s = esp_camera_sensor_get();
- // initial sensors are flipped vertically and colors are a bit saturated
- if (s->id.PID == OV3660_PID) {
- s->set_vflip(s, 1); // flip it back
- s->set_brightness(s, 1); // up the brightness just a bit
- s->set_saturation(s, -2); // lower the saturation
- }
- // drop down frame size for higher initial frame rate
- if (config.pixel_format == PIXFORMAT_JPEG) {
- s->set_framesize(s, FRAMESIZE_QVGA);
- }
-
- #if defined(CAMERA_MODEL_M5STACK_WIDE) || defined(CAMERA_MODEL_M5STACK_ESP32CAM)
- s->set_vflip(s, 1);
- s->set_hmirror(s, 1);
- #endif
-
- #if defined(CAMERA_MODEL_ESP32S3_EYE)
- s->set_vflip(s, 1);
- #endif
-
- // Setup LED FLash if LED pin is defined in camera_pins.h
- #if defined(LED_GPIO_NUM)
- setupLedFlash(LED_GPIO_NUM);
- #endif
-
- WiFi.begin(ssid, password);
- WiFi.setSleep(false);
-
- Serial.print("WiFi connecting");
- while (WiFi.status() != WL_CONNECTED) {
- delay(500);
- Serial.print(".");
- }
- Serial.println("");
- Serial.println("WiFi connected");
-
- //startCameraServer();
-
- //Serial.print("Camera Ready! Use 'http://");
- Serial.print(WiFi.localIP());
- Serial.println("' to connect");
-
- }
-
- void loop() {
- static unsigned long lastSendTime = 0;
- if (millis() - lastSendTime >= 30000) { // 每30秒发送一次
- lastSendTime = millis();
-
- camera_fb_t *fb = esp_camera_fb_get();
- if (!fb) {
- Serial.println("Camera capture failed");
- return;
- }
-
- WiFiClient client;
- if (!client.connect(pc_ip, pc_port)) {
- Serial.println("Failed to connect to PC");
- esp_camera_fb_return(fb);
- return;
- }
-
- // 发送图像长度(4字节大端序)
- uint32_t len = fb->len;
- uint8_t lenBytes[4];
- lenBytes[0] = (len >> 24) & 0xFF;
- lenBytes[1] = (len >> 16) & 0xFF;
- lenBytes[2] = (len >> 8) & 0xFF;
- lenBytes[3] = len & 0xFF;
- client.write(lenBytes, 4);
-
- // 发送图像数据
- client.write(fb->buf, fb->len);
- Serial.printf("Sent %d bytes\n", fb->len);
-
- client.stop();
- esp_camera_fb_return(fb);
- }
- delay(1000); // 减少循环频率
- }
电脑端Python程序
- import socket
- import struct
- import cv2
- import numpy as np
- import os
- import base64
- from openai import OpenAI
- from df_xfyun_speech import XfTts
- import pygame
- pygame.mixer.init()
- HOST = '0.0.0.0' # 监听所有网络接口
- PORT = 12345 # 与ESP32程序相同的端口
- appId = "f6e50ac1"
- apiKey ="11ecfe2c70c42cadda1bae3916576ec4"
- apiSecret = "NGQwMjdiYTY0ZGZkZDI5MTJlMGQ4Yzhk"
- options = {}
- tts = XfTts(appId, apiKey, apiSecret, options)
-
- client = OpenAI(
- api_key="sk-l77I27a8yfbu1hie5jj9FJOIexixS1RRdLFVEv2xbRiFsb3k",
- base_url="https://api.moonshot.cn/v1",)
- def ai_image(image_data):
- cv2.imwrite("Mind+.png", image_data)
- with open("Mind+.png", "rb") as f:
- image_data = f.read()
- # 按下 'q' 键退出
- if cv2.waitKey(1) & 0xFF == ord('q'):
- pass
- # 我们使用标准库 base64.b64encode 函数将图片编码成 base64 格式的 image_url
- image_url = f"data:image/{os.path.splitext(image_data)[1]};base64,{base64.b64encode(image_data).decode('utf-8')}"
- completion = client.chat.completions.create(
- model="moonshot-v1-8k-vision-preview",
- messages=[
- {"role": "system", "content": "你是 Kimi。"},
- {
- "role": "user",
- # 注意这里,content 由原来的 str 类型变更为一个 list,这个 list 中包含多个部分的内容,图片(image_url)是一个部分(part),
- # 文字(text)是一个部分(part)
- "content": [
- {
- "type": "image_url", # <-- 使用 image_url 类型来上传图片,内容为使用 base64 编码过的图片内容
- "image_url": {
- "url": image_url,
- },
- },
- {
- "type": "text",
- "text": "请描述图片的内容。", # <-- 使用 text 类型来提供文字指令,例如“描述图片内容”
- },
- ],
- },
- ],
- )
- message=completion.choices[0].message.content
- print(message)
- tts.synthesis(message, "speech.wav")
- pygame.mixer.Sound("speech.wav").play()
- def show_image(data):
- try:
- # 将字节数据转换为numpy数组
- img_array = np.frombuffer(data, dtype=np.uint8)
- # 解码JPEG图像
- img = cv2.imdecode(img_array, cv2.IMREAD_COLOR)
-
- if img is not None:
- # 显示图像
- cv2.imshow('ESP32 Camera Stream', img)
- ai_image(img)
- # 按'q'键退出
- if cv2.waitKey(1) & 0xFF == ord('q'):
- return False
- return True
- return False
- except Exception as e:
- print(f"图像显示错误: {str(e)}")
- return False
-
- def main():
- with socket.socket(socket.AF_INET, socket.SOCK_STREAM) as s:
- s.setsockopt(socket.SOL_SOCKET, socket.SO_REUSEADDR, 1)
- s.bind((HOST, PORT))
- s.listen(1)
- print(f"等待ESP32连接在 {PORT} 端口...")
-
- while True:
- conn, addr = s.accept()
- print(f"已连接: {addr}")
-
- with conn:
- while True:
- # 接收图像长度头
- len_data = conn.recv(4)
- if not len_data:
- break
-
- # 解析图像长度
- if len(len_data) != 4:
- print("无效的长度头")
- break
- img_len = struct.unpack('>I', len_data)[0]
-
- # 接收图像数据
- received = 0
- img_data = b''
- while received < img_len:
- chunk = conn.recv(min(img_len - received, 4096))
- if not chunk:
- break
- img_data += chunk
- received += len(chunk)
-
- # 显示图像
- if received == img_len:
- if not show_image(img_data):
- break # 用户按q键退出
- else:
- print(f"数据不完整: 期望 {img_len} 字节,收到 {received} 字节")
- break
-
-
- print("连接关闭")
-
- if __name__ == "__main__":
- try:
- main()
- except KeyboardInterrupt:
- print("程序终止")
- finally:
- cv2.destroyAllWindows()
【硬件设计】
【演示视频】
|

 沪公网安备31011502402448
 置顶卡
置顶卡 变色卡
变色卡 千斤顶
千斤顶


 活跃会员
活跃会员
 宣传大使
宣传大使
 创客造
创客造
 编辑选择奖
编辑选择奖
 志“童”道合
 编辑选择奖
编辑选择奖
 编辑选择奖
编辑选择奖
 编辑选择奖
编辑选择奖