|
【本期故事】 本期不是原创故事,是昨晚在看到一个http://www.instructables.com/member/botdemy/的 小车控制的作品。本帖就是把这个教程实现出来,同时和大家分享一下注意事项。
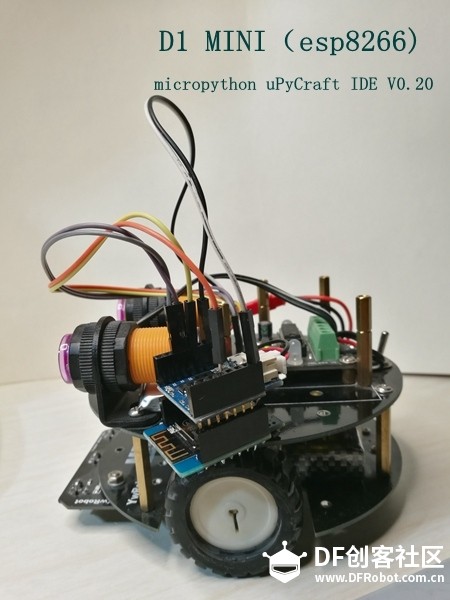
还是发一个视频: 通过平板浏览器访问8266上的socket server,然后把小车的控制参数传下去,8266这边用mp解析,然后驱动gpio口,通过电机驱动板来实现对小车的控制。
【硬件清单】 【软件准备】
品名 | | | | | | |
| | |
| | MicroPython-IoT-Rover-Based-on-WeMos-D1-ESP-8266EX代码 |
| |
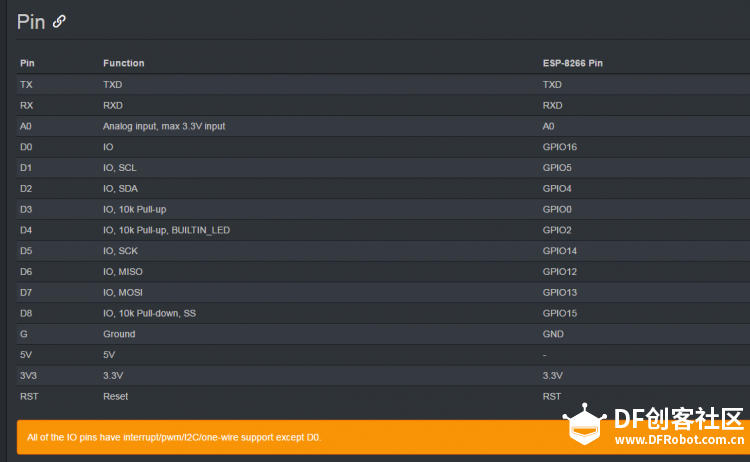
【接线】 #Wemos Dpin to GPIO 我的小车驱动板是L293D #D1->GPIO5----DIRA #D2->GIOO4----PWMA[mw_shl_code=python,true]import socket #D3->GPIO0----DIRB #skip D4 - built-in LED) #D5->GPI014 --PWMB 【esp8266代码】 import socket
import machine
import time
import network
SSID="your SSID"
PASSWORD=your psw"
port=80
wlan=None
listenSocket=None
def connectWifi(ssid,passwd): #建立wifi连接
global wlan
wlan=network.WLAN(network.STA_IF)
wlan.active(True)
wlan.disconnect()
wlan.connect(ssid,passwd)
while(wlan.ifconfig()[0]=='0.0.0.0'):
time.sleep(1)
return True
#HTML to send to browsers
html = """<!DOCTYPE html>
<html>
<head>
<title>Botdemy MicroPython IoT Car</title>
<style>
body {background-color: white}
h1 {color:red}
button {
color: red;
height: 200px;
width: 200px;
background:white;
border: 3px solid #4CAF50; /* Green */
border-radius: 50%;
font-size: 250%;
position: center;
}
</style>
</head>
<body>
<center><h1>Botdemy IoT Car Control</h1>
<form>
<div><button name="CMD" value="forward" type="submit">Forward</button></div>
<div><button name="CMD" value="left" type="submit">Left</button>
<button name="CMD" value="stop" type="submit">Stop</button>
<button name="CMD" value="right" type="submit">Right</button></div>
<div><button name="CMD" value="back" type="submit">Back</button></div>
</form>
</center>
</body>
</html>
"""
#Wemos Dpin to GPIO
#https://www.wemos.cc/product/d1.html
#根据我的小车电机驱动板进行的接线安排,玩家可以根据自己的小车驱动板进行调整,gpio io对照接线表
#D1->GPIO5----DIRA
#D2->GIOO4----PWMA
#D3->GPIO0----DIRB
#skip D4 - built-in LED)
#D5->GPI014 --PWMB
Lmotor1 = machine.Pin(5, machine.Pin.OUT)
Lmotor2 = machine.Pin(4, machine.Pin.OUT)
Rmotor1 = machine.Pin(0, machine.Pin.OUT)
Rmotor2 = machine.Pin(14, machine.Pin.OUT)
def forward():
Lmotor1.high()
Lmotor2.high()
Rmotor1.high()
Rmotor2.high()
def back():
Lmotor1.low()
Lmotor2.high()
Rmotor1.low()
Rmotor2.high()
def left():
Lmotor1.high()
Lmotor2.low()
Rmotor1.high()
Rmotor2.high()
time.sleep_ms(100)
stop()
def right():
Lmotor1.high()
Lmotor2.high()
Rmotor1.high()
Rmotor2.low()
time.sleep_ms(100)
stop()
def stop():
Lmotor1.low()
Lmotor2.low()
Rmotor1.low()
Rmotor2.low()
#Setup Socket Web
connectWifi(SSID,PASSWORD)
ip=wlan.ifconfig()[0]
listenSocket = socket.socket() #建立一个实例
listenSocket.setsockopt(socket.SOL_SOCKET, socket.SO_REUSEADDR, 1)
listenSocket.bind((ip,port)) #绑定建立网路连接的ip地址和端口
listenSocket.listen(5) #开始侦听
print ('tcp waiting...')
while True:
print("accepting.....")
conn, addr = listenSocket.accept()
print("Got a connection from %s" % str(addr))
request = conn.recv(1024)
print("Content = %s" % str(request))
request = str(request)
CMD_forward = request.find('/?CMD=forward') #如果在请求的包中,发现有/?CMD=forward,下同
CMD_back = request.find('/?CMD=back')
CMD_left = request.find('/?CMD=left')
CMD_right = request.find('/?CMD=right')
CMD_stop = request.find('/?CMD=stop')
print("Data: " + str(CMD_forward))
print("Data: " + str(CMD_back))
print("Data: " + str(CMD_left))
print("Data: " + str(CMD_right))
print("Data: " + str(CMD_stop))
if CMD_forward == 6: #如果此命令有效,下同
print('+forward')
forward() #调用前进函数,下同
if CMD_back == 6:
print('+back')
back()
if CMD_left == 6:
print('+left')
left()
if CMD_right == 6:
print('+right')
right()
if CMD_stop == 6:
print('+stop')
stop()
response = html #将html的网页定义装载在回应字段
conn.send(response) #send到浏览器上,就形成了控制界面
conn.close()
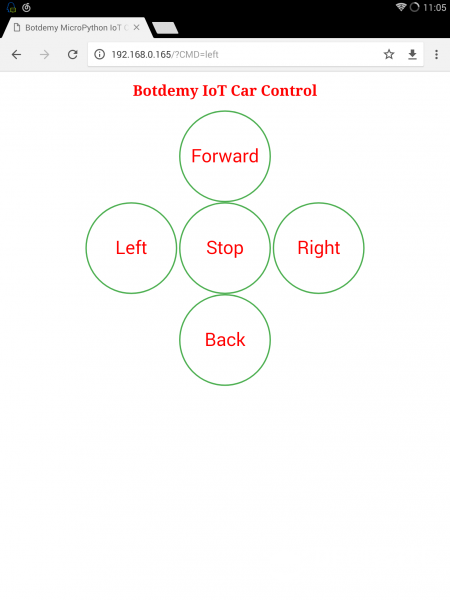
【测试】 用浏览器登录192.168.0.165:80 就将看到一个小车控制界面。这是按动按钮,小车就会随着控制而动作。其中左右转是100ms,前后没有时间限制。
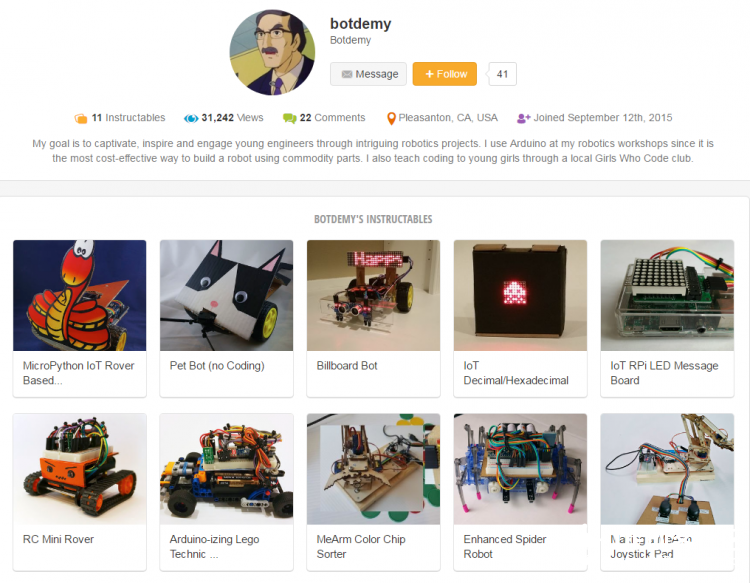
【小结】 使用esp8266作为socket web server,手机、平板、PC通过浏览器访问,驱动gpio端口,控制电机,从而驱动小车运动。micropython的玩法越来越多啦! 本教程修改自http://www.instructables.com/的作品。结合了官方tcp server代码,将网络连接部分在main.py中表达。今天在调试时发现,一旦建立wifi连接,这个conn就可能保存在flash某个位置。除非擦除flash,否则可能会自行连接。这一点还有待后续研究。 今天要鸣谢致敬的就是这篇文章的作者。 下面是他的头像和部分作品,可爱吧,小车居多,可见钻研之深。
| 
 编辑选择奖
编辑选择奖
 沪公网安备31011502402448
 置顶卡
置顶卡 变色卡
变色卡 千斤顶
千斤顶